Straight from the Life of Kel

My Life, My Loves & My Pursuit of Those

FO~ Another Fat Bottom Bag

Second one finished. I had only planned to complete 2 FBB and I did. One more WIP to check off!
Made out of Tahki/Stacy Charles Cotton Classic (100% mercerised cotton) 2 skeins with a about 24 inches left-over.
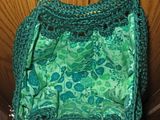
I had to use a J hook to acheive gauge with this yarn. I used my method to line the bag. I did hand sew because I am finding I like the result better than machine sewn.
I got the handles and broach from Joanns.

Clickable

Yarn Overload

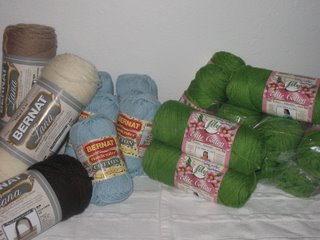
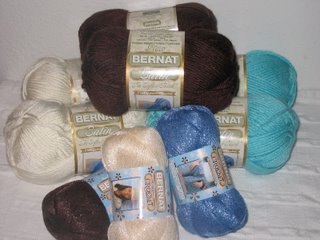
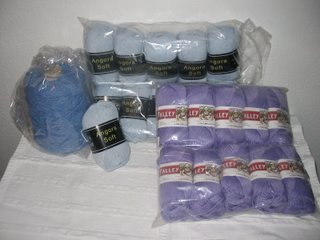
With my birthday money, I bought yarn, lots of yarn.

From Smileys:

3 skeins Bernat Lana (100% wool)~ 1 natural, 1 beige & 1 chocolate
5 skeins Bernat Handicrafter cotton~ blue haze
11 skeins Lily Elite Cotton~moss(color is much brighter than the swatch


From Knitting Warehouse:

6 skeins Bernat Satin~ 2 silk, 2 mocha & 2 lagoon (yes I love this stuff)
3 skeins Bernat Cool Crochet~ 1 demin, 1 summer cream & 1 chocolate


As I was typing this I realized how many skeins were Bernat. Weird that I bought alot of their yarns this time. Well, I guess it doesn't matter, does it?


From WEBS:

10 skeins Valley yarn Lonfmeadow (60% cotton/40% mircofiber)~ lilac
11 skeins Knit One, Corchet Two Angora Soft~ sky (I love this stuff)
1 lb Valley Yarn Everett Silk (70% silk/30% cotton)~ blue (it is a very tweedy type yarn)


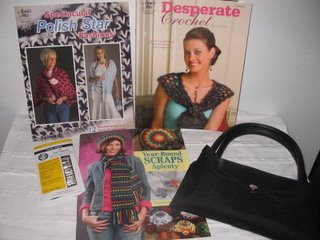
From Annie's Attic:

Desperate Crochet $.99
Polish Star $.99
Year-Round Scraps $.59
Needles
a folding tote


I mainly bought the pattern books because of the price. They were normally $9.99.
Are you shocked I posted 3 times today. I took a day off from school work and just chilled today. Well I cleaned but that can be relaxing for me sometimes.

Not Your Mama's Crochet Book Review


As stated below, I checked out this book from the library. The book's first chapter is all about the basics and is written well enough for a beginner to understand. Throughout the book are nice little tips or tidbits about crocheting. A great troubleshooting section and a nice section about blocking, wet or steam, and even when to block. A very small section on some common stitches and how to use them in your own designs. A wonderfully full chapter on yarn and dyeing, spinning, and recycled yarn. There is a well written chapter on measuring and sizing. A break down on reading patterns that would be very helpful for a beginner just learning to read patterns. Most of the patterns are beginner patterns but there are a few that I found interesting, the "Pseudo-Kimono", the "Who Hat", "When Jeans Don't Fit Recycled Demin Rug" and the "Weekend Vest" all looked interesting enough to consider. Each pattern has a variation side box which I thought was very neat. All in all, this would be a good reference book and I am putting this book on my wishlist.

Rating
*****

Fun Book Find

Every Tuesday my local library has an used book sale. While I was there picking up reserved books, I went and looked through their selection of children's book. Look what I found for $0.50.


It is a sweet children's book about shearing a sheep's fleece, cleaning, carding, spinning, dyeing and knitting with it all the while the sheep are trying to get their fleece back. The sheep end up with knitted sweaters that they love and every spring after line up for their shearing.
Caleb enjoyed the book and I love the fact that is about something I am interested in and it can involve Caleb. I would recommend it. The picture were beautiful and bright. The story was not too long but very cute..

I checked out Not Your Mama's Crochet and Tis' the Season to Crochet. I haven't had a chance really look through them so I will give a quickie review after I can get through them.

And I still owe you yarn photos from my big online shopping spree. More later today.

Sew you wanna line your fat bottom (bag)? Fat Bottom Bag Lining

Like the title?? It makes me giggle :)

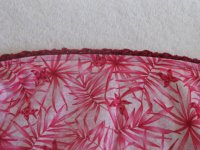
I made a picture tutorial for a simple way to line the Fat Bottom Bag from SnB: HH. I used this method for my first bag and it turned out amazingly perfect, much to my surprise. The bag is lined before you start the handle flaps. I cannot stress the before enough. When you start the handle flaps, the bag will be gathered at the handles and it is very difficult to line a bag that is gathered.

Materials Needed:
measuring tape
scissors
fabric for lining
sewing thread to match yarn
pins
needle for handsewing or sewing machine for machine sewing


So to start, finish your Fat Bottom Bag body portion and weave in all ends before you begin. The body will not lay completely flat. Due to gauge and yarn differences, I will not be adding measurements for the lining but will show how to find your measurements.
  • The widest portions will need to be measured. Folding like shown in the below pictures will help body lay flat for the areas that need measuring.

    A. B.
  • Add 1/4 inch to these measurements for seam allowances. This lining will be a rectangle shape so no tracing is needed to fit the bag.
  • Cut lining to fit the measurements..remember to add the 1/4 inch before you cut.
  • Fold and press all four sides over 1/2 inch. (Not a typo, 1/2 inch because of spacing)
  • Now is the fun part pinning the lining into place. Start with length sides (A.) first. Find the center and starting pinning, leaving 1/4 inch from the top or enough spacing between the lining and edge so you will have loops to crochet into. (the 1/4 spacing should go all the around the bag for uniformity.)
  • After both length edges are pinned, it should look a bit like this

**The sides will have extra fabric, that is the way it needs to be. It will allow 100% usage for the bag space. With this method you will not end up with a short lining therefore will not rob the bag of valuable space.**

  • Gather the extra fabric to form pleads (folding the fabric over onto itself) at the sides.
  • 3-5 pleads should be plenty. Pin pleads down. When completed, both sides should look like this.
  • After all four sides are pinned down, this is what it should look like. The body will not lay flat but will curve into a bowl shape.
  • Now you are ready to sew the lining into place. Using a machine or sewing by hand are both effective for this task, whatever you prefer.
  • Handsewn with a whip stitch
    This is the first Fat bottom bag I made and lined.
  • Machine sewn
  • After the sewing is done. Move onto the handle flaps per directions in pattern.
  • Finish the bag as directed in pattern and you should end up with

If there are any questions or comments, if I can make anything more clear, please let me know.

Email me crochet_kel(AT)yahoo(DOT)com or comment here. I don't actively use that email address anymore.

If you are on Ravelry.com .....I am kelcrochets there and I go there daily, so much quicker response from me on ravelry.

Copyrighted 2006
Sidebar Links and Information

About Me

Name: Kel
Home: Thurston County, Washington, United States

More About Kel »


Fat Bottom Bag Lining

Join | List |
Previous | Next |
Powered by RingSurf
Powered by Blogger